Wednesday 30 January 2013

Assignment 2 - Design and Print A Sample Review

Do you feel you made a good selection from your drawings to use as source material for your design ideas?  Which interpretations worked best and why?
Yes, I'd tried screen printing as part of 'Experiments with Printing and Painting' so I knew that the bold shapes with clean edges would work well.  I'd decided to select a square design so that I could use it to make repeats.  Initially I enlarged the squares and selected the two that I though would work well together as the lines seemed to flow from one shape to the next.  I then altered them by hand so the thicknesses matched and there were no 'cut off' edges.  Now, whichever way the squares were orientated, the shapes would flow seamlessly.


Which fabrics did you choose?  What particular qualities appealed to you?
I was keen to layer the prints so wanted a plain light background that would not be distracting or distort the colour of the ink on this occasion.  I did try a patterned background in my experiments but preferred and reverted back to plain.  The fabrics were cotton and linen.  I liked the closely woven cotton for a single print which the ink soaked into to give clean lines, flat colour and a clear contrast.  For layering the prints I liked experimenting with a slightly more open weave as the colour beneath would show through and create texture.  It was interesting to notice how the surface became less porous with each layer and how some fabrics required more pulls with the squeegee to get a good print.


(Reflect on some of these questions)

Is the scale of marks and shapes on your samples appropriate to the fabric?  Would any of your ideas work better on a different type of fabric - for example, sheer, textured, heavyweight?  Why? Do the marks seem well placed, too crowded or too far apart?  Were you aware of the negative shapes that were forming in between the positive shapes?  What elements are contrasting and what elements are harmonising in each sample?  Is there a balance between the two that creates an interesting tension?
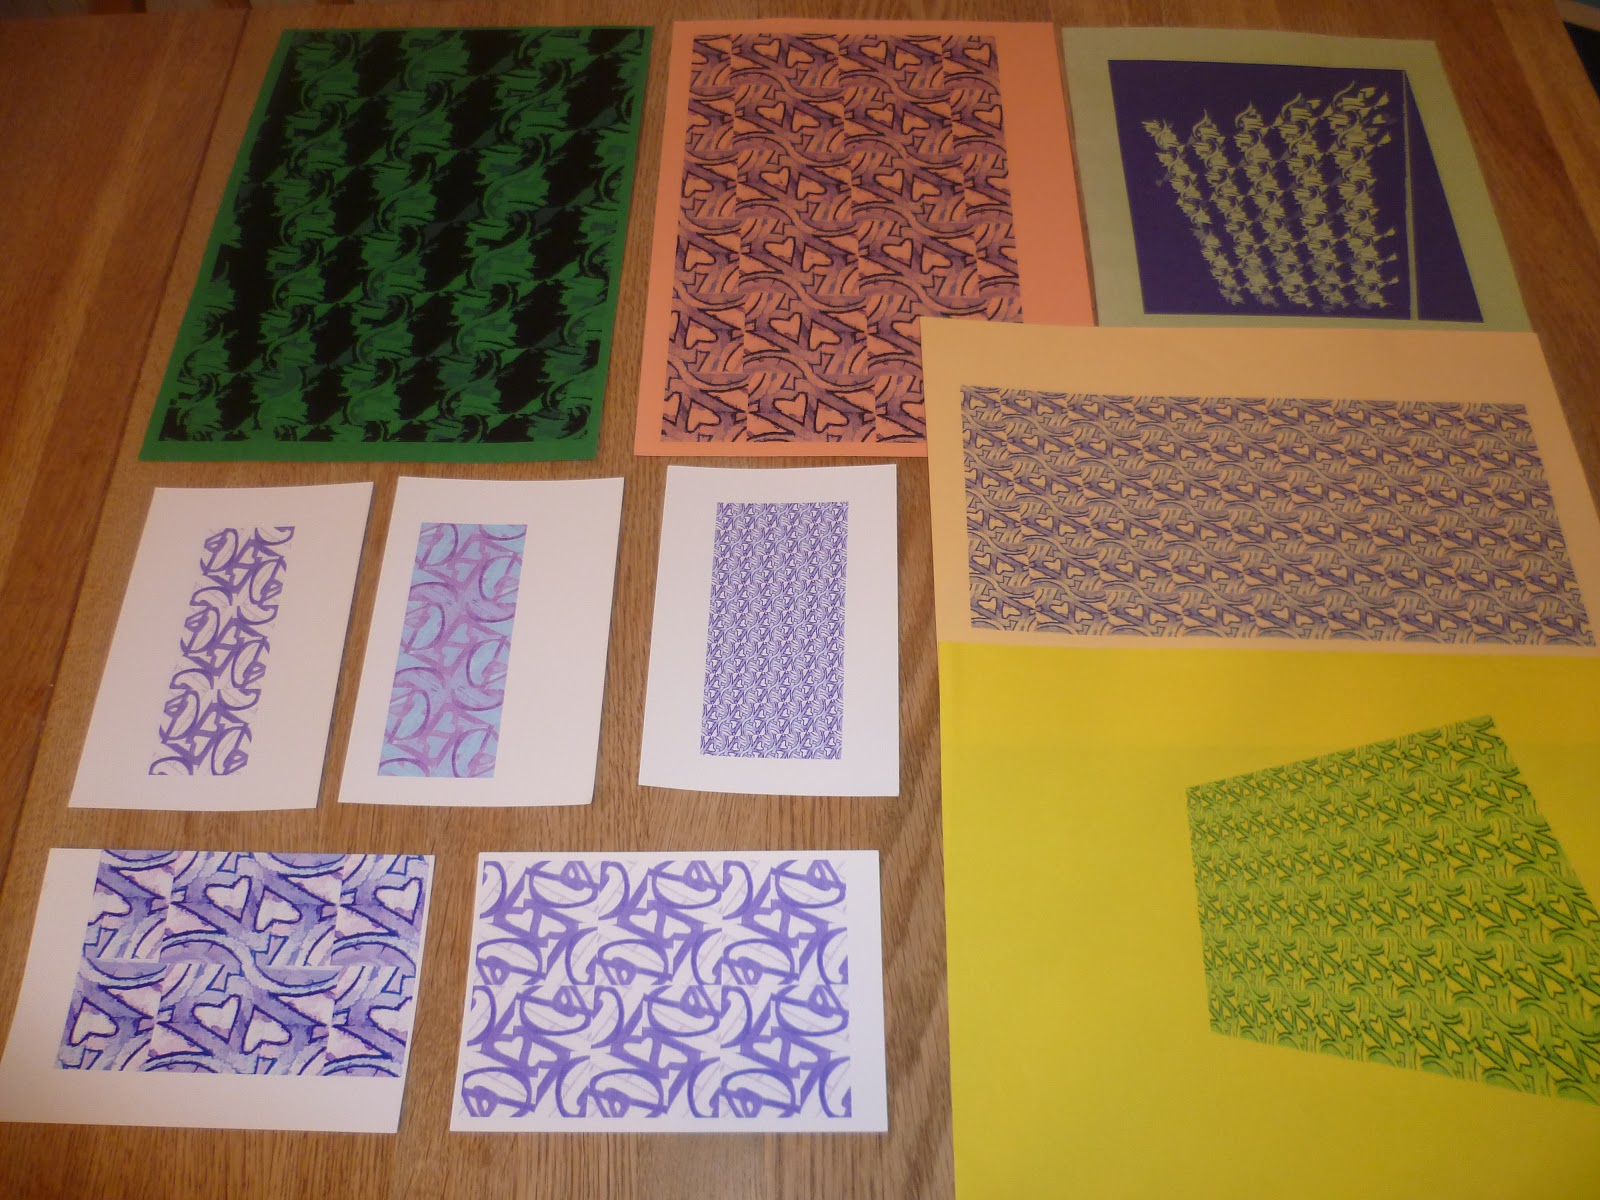
I think that for the size of the square, the bottom right print shown above appears to be on the right scale and has a nice balance  whereas the top two would need to be in a block of at least four adjacent to each other to feel right.  The bottom left does not have enough negative areas to make the shapes clear.  It made for a good background but when this was used on top of another design, it obscured it far too much.  I was aware of the negative shapes appearing, particularly in the bottom left as they looked like little hearts.  The repeating design on this is slightly on the diagonal which creates some tension but I feel would be better either square or with a more slope rather than somewhere in between. I don't know enough about screen printing techniques yet but it might be interesting to repeat the bold designs on a sheer fabric.  I can imagine the same scale being used for a long curtain with the light coming through the negative areas. 

Layering prints - the large patterns (top middle) still look exciting and have a good balance of negative space but look at the print below it where the original is almost completely obscured

How successful do you think your sample is?  Do you like the design?  Have you recreated or extended your ideas from the previous sample so that there is a visible development between the two?  Does your repeating design flow across the surface, without obvious internal edges, or do the shapes and marks in your single unit sample relate well to the size and shape of the fabric?  Do they make an interesting composition on this larger scale?


I like elements from all four samples on the top right.  I like the scale and the clear colour contrast of the orange top middle print, however the repeats only flow seamlessly in one direction rather than both which is slightly irritating. I like the movement and the colour combinations in the print below it.  It feels happy and reminds me of the big prints of a 1970s summer. This is the one I would like develop further if I had time, sticking with the colours but butting and rotating the original design to make a larger screen. 

In the print to its right (more vibrant in real life!), I like how the ink has translucence and the colours have mixed so the original negative areas from the bottom layer have turned red or orange


This final sample I like overall, the scale as it is, the colour balance and the formation of new shapes.  It evokes memories of cutting out shapes to make paper snowflakes as a child.

Project 4 Review - Developing Design Ideas

Did you manage to make space move?
Yes.  Compare the static Pictures 1 and 4 with the energy of 2 and 3.  In 1 and 4 the arrangement of black squares is more 'peaceful'.  Energy is centred because of the symmetry and regular sized gaps between the squares.  Also because the edges are parallel to the large square.  Pictures 2 and 3 have movement. It feels like you want to put back and stack the shapes escaping out of the box like a box of cards that's been dropped.  The eye wants to move around the space in the square.  The same applies with the lines. 


What are your thoughts about the drawings you did in Stage 3?
I was pleased to be able to find more potential in the original garden gate stitched sample that I had reworked in the Stitched Collage Workshop. Now that I was happier with improvement in the texture, I wanted to further explore the dynamic shapes that I had always liked, created by the curved lines crossing straight. Using differently shaped viewing frames, I decided I liked the balance better in the circles and squares and thought that the squares had most potential as I could create so many variations in repeats.   


Were you able to use your drawings successfully as a basis for further work?  Are there any other things you would like to try?
Yes.  I scanned the drawing which was really helpful to experiment with.  I could quickly create repeats and change the scale and colour. I wanted to try prints and was about to do a 'Make a Mark' workshop at West Yorkshire Print.  This would be an opportunity to develop the drawings and work toward a final screen printed sample for this assignment.  My drawings would be my starting point.


Now that you have a good working method, do you feel confident that you can carry on working in this way independently?
Yes, I've found that I can now 'see' shapes and interesting compositions more quickly and easily.  The drawing below of a sliced shell at the Turing exhibition was selected from a series of 1 minute sketches.  Though I'm not always getting it quite right yet, I've been trying to apply the principles I've learnt to practise arranging some of the drawings in my sketchbook in a more interesting way. 


Wednesday 9 January 2013

OCA Textiles Study Visit - Light and Line

My first visit to Barnsley on a frosty December day to meet my tutor and other students at the Civic. The artists, Anne Morrell and Polly Binns, were new to me and there wasn't a huge amount of information to be easily found on their work before the day. This was a short visit and the activity was to take a look around the gallery, identify which pieces immediately captured our interest, select one and to meet back with the group to visit one of our selected works to explain and discuss our thoughts. 

As soon as I entered this touring exhibition, I thought of Alice Fox and her wonderful 'Textures of Spurn' project that I reflected on in November.  References to water and the coast were immediately obvious from the colours to the rippling patterns. The first piece of work that caught my attention was Anne Morrell's 'Verdure:2' (2011), below on the left.  From these photographs, it's difficult to appreciate, but although it was flat and stretched on a canvas like a painting, from a distance it looked very three dimensional, compared to the two on the right, and this enticed me to come for a closer look.

 
The gallery was bright and as there was no glass on the frame (each of the frames on these three were the same tone but different colour), it was good to be able to see the stitching up close and appreciate the detail. Only one simple stitch was used throughout.  This area below was just comprised of parallel lines of running stitch.  The thread has delicate changes in shade though, and as it is worked from the back, puckering is created.  Combined with the dyed background it results in contrasts of tension and it reminds me of looking down at the sea from high above - the ripples of the tide and the contrast between the deep and shallow areas.


The colours were slightly less fresh and vibrant but certainly reminiscent of the seascape shades I so often respond to and chose for my colour bag earlier in this assignment.
 
 
I am sure that the main reason I was drawn to this work is the happy memory it evoked of sitting on the rusty pier below in Greece.  We had just missed a boat trip so sat and waited an hour for the next one.  It was just my husband & I on honeymoon, the kids were at home with Grandma, and it was so warm and peaceful looking down at the patterns in the water and listening to the gentle lapping of the water. I can imagine the brown areas as the criss-cross shapes of the rusty structure.   


Looking next at Polly Binns's work next, if felt far closer to home and less exotic.  This piece, 'Overstrand Interlude' (2011) below, reminds me very much of darker, oilier and wet sand so I was not surprised to find out that the artist spends a good deal of time walking on Norfolk beaches before working.  This was simply hung on nails so again I enjoyed being able to get up close to this to see the detail.  The 'V' shapes bleached (or possibly painted?) into the fabric I imagined as sea birds footprints.  Some of these lines were enhanced by machined running stitch which subtly increases the reflective qualities. As in Morrell's 'Verdure:2', just one stitch is used throughout.


All the work exhibited was fairly recent, created within the last few years and it was interesting to consider the similarities and contrasts in the way the two artists approach the 'light and line' theme.  Both are meticulous observers.  Polly Binns knows the landscape intimately from her walks and works more directly from memory and briefly recorded marks.  She now almost never photographs.  Anne Morrell has a more considered and detailed process of development.  Below are some of her working samples which we were delighted to be able to handle and inspect.


To me the exhibition felt like a series of personal explorations rather than finished pieces I might want to take home and hang on my walls. I don't necessarily think they all stand up in their own right but it is certainly an interesting collection.  You can see the direction of the work gradually changing from the earlier to later pieces. Anne Morrell for example seems to have moved away from colour completely towards concentrating on form and surface texture and most of the group preferred her later work such as this un-dyed piece below.  'Axial' 2012 had an unexpected composition.  All the interest was at the top with a large blank area at the bottom as if it is floating. 


Only one stitch was used yet again.  Even the length of the stitch stays the same and all the effects come from varying the distance between rows and the degree of puckering.  For someone like me, who likes to layer and adorn endlessly this is a good lesson in how effective it can be to keep things simple sometimes and how it's not necessary to have a repertoire of complicated stitches.  Which is just as well.  At the Embroiderer's Guild last Friday, we tried out some unusual stitches.  Two hours later this was all I had managed! (Guild recommended two Beaney & Littlejohn books: A Tale of Two Stitches and Stitch Magic - good for exploring the boundaries of stitches. They're a bit expensive but on my wish list.)


After this and other recent exhibitions, by using critical approach guidelines, I've realised I'm becoming gradually more in tune with why a particular work attracts me.  Maybe on a future visit, I should choose something that turns me off and try to work out why.


Another lesson I'm learning is relying on photographs less for inspiration and and more for a memory jogger along with notes and sketches.  In a gallery or outdoors when it's freezing, the drawings I'm making now are often very quick and rough but they're working for me as a starting point. However, I still nearly always carry my camera to catch something unexpected like the frosty view I spotted on the drive to Barnsley.  Dodging the lorries thundering past as I stood in the road and knowing I'd be late for the study visit if I got the pencils out, I thought this was a justified time to use camera!  


OCA report by Pat Hodson can be found here: http://www.weareoca.com/textiles/light-and-line-in-barnsley/


Monday 7 January 2013

Project 7 - Beginning a Theme Book

I appreciate that I'm nowhere near Project 7 yet, but reading the coursework ahead, there doesn't seem to be any reason not to begin this sooner.  Local textile artist Anne Brooke has begun a series of five 'Workbook Workshops' which will run until next August.  I've been to the first two sessions and there is a theme at each one e.g. Inspiration, Recording and Typography.  There are demonstrations and then we can use the time however we like to try out techniques or work in a sketchbook or journal. We present our work, discuss and share ideas so it seemed like the ideal opportunity to dedicate time to work on my theme book.

Deciding on my theme took much thought.  'Glass' and 'Family History' were the two I kept coming back to.  Eventually I decided on the ancestry theme because there seems nothing more personal than my own family history and there is more of an urgency.  I'm aware that as living relatives age, some of the information and stories I may capture could be lost forever.  At the many exhibitions I've visited since starting this course, I've always been interested when an artist has stated their work been influenced by their home or roots, whether it is the traditional colours or techniques, such as Aboubakar Fofana's indigo dyed 'trees' that I loved at the Cotton: Global Threads study visit. I wanted to look in more detail ways to represent memories and family history visually.

One of the challenges of this theme is that most of the inspiration stems from documents, verbal stories and photographs. I'm very wary of getting too sentimental and sticking in too many happy sepia photos, particularly after reading the heated discussion that arose on the OCA blog following tutor James Hunting's post 'Why Nostalgia Makes Me Weep'. There is little in the way of actual objects for my theme and I don't yet imagine myself working in an abstract way like Sue Hiley Harris.  In her Ancestor Bags Exhibition, she admits she has no time for pattern and decoration. Structures, symbols and geometry are what appeals.

Below is a coloured pencil drawing I've done of John Beetham Benson's wood cutting tool - one of the few artifacts I do have.  I believe my great grandfather was a cabinet maker in a family business in Liverpool around 1900.  The background is overlapping outlines of the shape in a black Zebra pen. Anne showed us that these can be quite effective to make shadows when used with water and a brush to blur the edges. 


Anne had recently bought an old typewriter we could try out. It has been many years since I used one and great fun. How quick and easy it was to use too compared to a printer!  I could just put my paper in and position it whichever angle I liked, though I was slightly confused by the zero being the same key as capital letter O! The font was identical to the letters in the name 'J.B. Benson' stamped on the tool and also similar to the names 'Robisorby Sheffield' and 'Ross Alexander Liverpool' which I could just make out with my magnifying glass.  I've now discovered these were the manufacturer and tool dealer.  These little details and the dents and marks on the tool feel like clues that help me to imagine the life lived.

It was not long after Remembrance Day so I decided (high risk of becoming nostalgic!) to dedicate a page to Arthur Francom, my Grandfather's brother who was killed in action in 1918. Most of the information I collected, I had already seen, but in making this page I've noticed details I'd not before considered, such as the date the battle began was Arthur's birthday, which is why I added the question 'How did you spend your 19th birthday?'. I wondered how he felt that morning. Had he been reading a letter from home and how much did he know about what was about to happen?  

I typed an extract from a letter written to his relatives who had enquired about the circumstances and discovered I could paint over the text and it was still quite visible so used this to start the large poppy.  My Grandfather had once told my dad that his older brother Arthur had volunteered and 'you couldn't tell him anything' and this information is also incorporated.  The poppy collage is made up of painted areas and papers and the central part is crumpled baking parchment I had kept after experimenting with dyes.  This lifts up to reveal uniformed Arthur's photograph. I tried my new gouache paints for the small poppies and various materials to get a red spatter to represent the spilled blood on the map of Lys where the fatal battle took place.  Red ink flicked from a soft brush gave the best effect. 


I've never got on well having general sketchbooks but so far, I've found I really like collecting information by theme.  It's somewhere I can put, and find related notes and ideas, sketches, experiments and information.  I can imagine having a collection of themed books rather than one sketchbook so is maybe this is an approach I can try for future.